Showing posts with label Flowers. Show all posts

Friday, 20 July 2018

Mixed Media Buddleia Card


One last thank you card for Abacus on Jessica's last day. She used ink pads, paint, stickers and crystals to create this impression of a buddleia flower head to say a final thank you and goodbye to all  the staff who have made the past fifteen months at Abacus so enjoyable. Farewell!

Sunday, 24 June 2018

Blow Paint Poppies

We're participating in 30 Days Wild this month, which is a fabulous challenge run by The Wildlife Trusts. Admittedly, this was much easier for us to do before Jessica was stuck down with chicken pox but we're trying hard to keep going and do something inspired by nature every day in June. 

So, one day last week we took inspiration from the poppies that Jessica has been growing this year and had a go at painting a picture of poppies using a blow-paint technique. We used ready mixed paints but I think liquid watercolours would have been better to be honest. We squidged a spot of paint at the top of each stem and blew the paint into the shape of a poppy. The blow affect is a bit lost as the paint was so thick but it was still an enjoyable activity and we'll learn from our mistakes and try watercolours next time!


Friday, 30 March 2018

Handprint Popcorn Blossom Tree


The ornamental cherry tree in our garden has started blossoming this week, which inspired us to get crafting. We love creating mixed media pictures; this one uses popcorn as cherry blossom, cotton wool as clouds and we also used crystals and stickers as decorations. Jess practiced her scissor skills, we used her handprint as the tree (would you believe that I've run out of brown paper?!) and she chose to paint the popcorn pink. I love it!

Friday, 16 March 2018

Hand Painted Glass Vase

When someone special in your child's life has a birthday it would be rude not to make a fuss don't you think?! This post and the next will showcase Jessica's efforts for one of her favourite people on this whole planet!


This first gift (photos are front and back views) is a cylindrical vase decorated with her drawing and writing. She drew her design on a small piece of paper which I placed inside the vase to trace over using black relief outliner. After drying overnight, Jess painted the design herself. Drying it without the paint running was a challenge because of the shape of the vase so we'll be shopping for square vases in future!

Saturday, 10 March 2018

Fork Painted Tulips

I came across this craft idea on Facebook. Aside from eating cake, what better use could there be for my Mary Berry forks than painting beautiful spring tulips?! Jessica insisted that she was pretending to be an artist in her studio cafe; I had to pay to join in!


Saturday, 8 July 2017

Dried Roses

David bought me some beautiful flowers for Mum's anniversary the week before last but the roses faded fast (probably due to the heat) so I removed them from the bouquet and set about drying them. I love the delicacy of dried roses and there is something really special about being able to preserve a flower to last so much longer. Here are some of the roses from David...


The following ones are at least a year old and still look absolutely stunning. All I do is put them in an empty vase (no water) on the windowsill and wait. The ones from last week went a bit droopy so I moved them into an upside down hanging position in the conservatory for a couple of days before the stem dried out completely and that sorted them out a treat.


Finally, I have also dried out a couple of the rose heads from my memorial rose in my garden. The roses on the plant are white, occasionally with a yellow or pink hue. They don't stay white when you dry them out, as you can see, but they are still beautiful. 


I haven't managed to find any other flower that you can do this with so far. Any ideas anyone?

Friday, 7 July 2017

Pressed Flowers


We opened up the flower press this morning and Jessica arranged the flowers and petals from our garden face down on contact paper. We then popped a piece of card over the top to create yet another botanical creation. My favourites are the single petals and I think we'll use just petals next time aiming to create something like a mandala from them once pressed. They seem so delicate and press really beautifully, partly because they have less moisture than the fleshy parts of the flowers. 

When pressing your own flowers be sure not to overcrowd the flowers in the press. Just put two or three per layer. We use construction paper around the flowers between the layers card as this soaks up the moisture. We left them for just three days this time. This was ample time for the petals and many of the flowers but the bulkier ones like the fuchsias probably needed a week I think. I don't like using glue on our pressed flowers (reintroducing moisture) so we always use contact paper (sticky-backed plastic). We often make suncatchers from them by framing them in an aperture cut from card with contact paper front and back to seal them in. They always look beautiful but the colours fade quickly in the sun.

Go on, give it a try!

Wednesday, 5 July 2017

Flower Pounding

We've put some flowers from the garden into the press this week. We haven't done any since last autumn so Jess has forgotten that it takes a while before we can get them out and use them to make something beautiful. So, I thought we'd try something new today and we have tried flower pounding. That's right, I let Jessica loose with my pin hammer and we both escaped injury - phew!


We chose lots of petals that had fallen from my plants in the garden and placed them face down on some acid-free watercolour paper. We covered the petals with kitchen paper and hammered away. Satisfyingly vivid colours bled through the kitchen towel and when we revealed the artwork there were squeals! We actually found it better to do the hammering a few petals at a time and it was really interesting how the dyes coming out of the flower differed from the actual petal colour. Every red petal we tried came out purple for some reason! 

Here's Jessica's beautiful botanical artwork...


Tuesday, 16 May 2017

Buddleja or Lilac Collage


This piece of Jessica artwork was inspired by a beautiful card I received for my birthday (thank you, Katie!). I'm afraid to say that she liked it so much that she started writing her name on it (sorry, Katie!) before I could get a photo of it for here...


Katie's card is embossed and then she has filled each circle in the design with various jewels and studs. It's stunning and gave me the idea to do a collage with Jess. I can't decide whether we've created a lilac or buddleja flower but either way I love it! I drew the general shape and punched out a whole load of circles then Jess got to work with her glue and stickers. She decided she liked them overlapping so we have a really full head of flowers. It was a great preschool craft. Thank you for the inspiration, Katie.

Monday, 24 April 2017

Mixed Media Bluebells

We had a lovely walk to some bluebell woods with Toddler group this morning and then spent the early evening trying out making bluebell pictures from dyed farfalle pasta, watercolours and strips of paper. We're going to be doing these at Toddler group in a couple of weeks, when I'll aim for curvier stems and a better shade for the pasta but I really like Jessica's idea of doing some purple painting on the picture too. 


Here's the little lady in the woods this morning reminding me that she does not like having her photo taken...


Wednesday, 29 March 2017

Tissue Paper Tulips

We have our first tulips out in the garden and our fishy suncatchers were looking a little sad so we've made a few tissue paper tulips to brighten up our windows. I love the authentic looking droopy leaves! 


To make these we:

1. cut tulip shape apertures from a piece of purple paper

2. covered with contact paper

3. stuck small pieces of tissue paper to the contact paper until the whole tulip was covered

4. cut around the tulip leaving a thin purple border

5. taped a tissue paper stem and leaf to the back of the tulip

6. taped to the window

Sunday, 19 March 2017

Paper Towel Roses

We're getting ready for Mother's Day at Toddler Group tomorrow. This week we'll be decorating upcycled toilet roll vases and making paper towel roses. 


There are two types of rose here. The first one has kept us busy with watercolours and pipette painting. We've been dripping watercolours onto kitchen paper and then leaving them to dry all over the house!


Once they're dry we separate the two sheets of paper on each towel and then cut each one in half to form rectangles. You need two rectangles for each rose and they both need to be folded twice to create long, thin rectangles with four layers. Attach one end of one of them to a straw (we used plastic tape) and then keep wrapping. At the end of the first piece I have just carried on with the second (no need to tape together) before using the plastic tape at the base to secure the rose to the straw.


The second type is made from unpainted kitchen towel in the same way and then coloured in using felt-tip pens. They're quite striking.


I have glued cotton pads to the base of the toilet rolls so that the flowers don't fall through the bottom and have covered them in coloured paper ready for the little ones to use stickers to decorate them. Here is the trial one that Jess made...


Monday, 6 March 2017

Popcorn Hyacinths


We're making these popcorn hyacinths at Toddler group this morning, inspired by Jackie on i heart arts n crafts. We tried it out last Friday and were pleased with the results. 

We used a long piece of green paper as stems and leaves and glued some popcorn to either side of the stem before painting them it in our chosen colours. 


Here's a closer look at the flower...


I have to be honest, they look at their best the moment you finish them as the moisture in the glue and paint cause the pieces of popcorn to shrink so the final flowers are not quite so full. They still look pretty good though.

Wednesday, 22 February 2017

Spring Wreath

My garden is definitely telling me that Spring is on the way so I thought I'd share this wreath that Jessica and I made together last year. If I remember correctly, we purchased everything for this craft from Hobbycraft. We actually bought tonnes more than we used but decided less was more on this project. The large roses are foam and the smaller ones are inexpensive pre-wired flowers. We literally just pushed the wires through and twirled them around a bit to secure. Really easy and so beautiful.


Friday, 3 February 2017

Flowers for Mum

Mum loved flowers. When she died in the summer I knew that I wanted to arrange at least some of the flowers for her funeral and wake. It was an enormously therapeutic thing to do the evening before her funeral. It took time and focus and enabled me to be by myself for a while to mentally prepare for the day ahead. I needed to pay tribute to the brave, loving woman who had left a close-knit family behind and who had helped shape her two daughters and three grandchildren into the equally strong, caring and compassionate people that I hope we are.

I remember quite clearly the time when she worked at Pickles & Co. creating her own dried flower arrangements and I used to love doing them with her in holidays as presents for my friends. I hadn't really done anything since and I know that a professional would have done a much better job but these flowers were arranged with so much love and I know they would have meant a lot to Mum. This first one would have been her favourite...


Wednesday, 12 June 2013

Dried Roses

Well, it’s been a while and I really haven’t done anything crafty in the time that I’ve been away. I am hoping to find some time, energy and inspiration soon though. I’ll have to get going pretty quickly as I need to try out a new craft that I will be sharing with some pupils during this year’s co-curricular day at school.

Mum and I did go wool and pattern shopping last weekend though. She’s now busy knitting jumpers, cardigans and monkeys for Katryn and Archie. Now that’s real therapy!

Today’s post is not strictly speaking about a craft but I was given some yellow roses for my birthday (thanks Abigail), which I have dried out to go with the red ones that I was given by some of the school leavers from 2012. There is something about our flat (and probably the dehumidifier) that means I can dry them out relatively easily and they maintain much of their colour. I don’t do anything special to them at all. Here are the results…

FB_319

Saturday, 31 March 2012

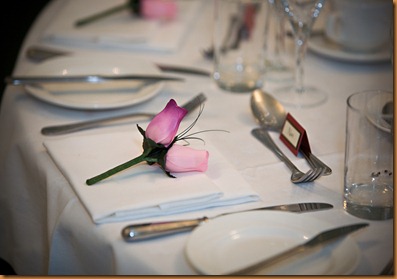
Wooden Wedding Flowers

It occurred to me this morning that I have shared very few of my crafting exploits from my own wedding back in February 2009. I made all of the invites, orders of service, wine glass charms, favours, thank you cards and even the wedding cake (which is an amusing tale that I shall share another time…). The biggest task that I set myself was to do all of the wedding flowers – bride, bridesmaids, buttonholes, table centrepieces and thank you bouquets. I bought thousands of wooden roses and my lounge turned into a workshop for weeks. I loved it and even now, 3 years later, everywhere I go people have our wedding flowers on show in their homes. When I chose to use wooden roses it was due to the time of the year that we were getting married and the fact that I wanted to do them all myself. There was no way I could have done it on my own with real flowers. I hadn’t thought about the fact that they’d last forever but it was a great bonus.

Anyway, here they are…

Katryn’s bridesmaid flowers

bradnum_083_blog


Men’s buttonhole – I made them for the women as well but they had two cream roses

bradnum_055_blog


My flowers

bradnum_194_blog


Centrepieces for the tables named after the Islands of the Outer Hebrides

bradnum_350_blog


Small arrangement for each person at the reception
bradnum_341_blog

I hadn’t expected guests to use them quite like this…

bradnum_430_blogbradnum_476_blog     bradnum_466_blog

Related Posts Plugin for WordPress, Blogger...